Henry Sears & Son restoration (sort of)

Messages
62
Some weeks ago I picked up from the Ebay a pair of samples of HENRY SEARS & SON Straights , a Barber's Queen 5/8 with black bakelite scales and one 5/8s (no model on the tang) which had a nice set up with a sort of "ivorine" cream scales and matching "scaled" tang.

Here I have a question:
both the Henry Sears and son are marked 1865, but I guess that is the year they were established and from what I found online the "son" bit came after 1883.
The scales are definitively post 1907 (bakelite was not available before) therefore I guess the razor could be dated around Mid20s-30s? On the original box there is a price stated of 3$ and the clar indication that the Steel was german.
Can any of you shed some light on its age?

Going back to the "restoration", after doing some research and buying few tools I did not have in my well supplied laboratory I started working on the Barber's Queen and began by breaking one of the well preserved bakelite scales (grr:mad:); despite of being careful, the pin was well ground on both sides, as soon as I tapped it with the pin "punch" one scale snapped.

Anyway, I polished the blade using the "hand method" being careful not to touch the edge and once I was sort of happy (it is not mirror polish, but I was not really after a mirror finish) I focussed my attention on the scales.

Sitting in a drawer I had an un-used set of boring plasticky-acrylic scales which were a little bit twisted... I fixed the defect, trimmed & reshaped a little the wedge, reshaped the scales profile and sanded out the acrilic plasticky surface leaving a nice silky matt finish.

For the pinning I started using the classic brass rod & washers method, but then decided to try something new and got a handful of 1.5 x 13mm Brass Rivets and used those to complete the razor.

The Brass rivets have a domed head and theoretically , with the right punch (which I had) one should be able to punch a proper head on the open side... I guess you need to either heat the rivet or to use some force to obtain a proper dome head, anyway I was afraid of causing an irrepairable damage therefore i simply hammered the pin "the stardrd way" then I sanded a little bit the domed side just to make them "equal".

Then I got my self a set of honing waterstones (a king 1000-6000 and tri-set from a UK ebay seller) and proceeded with the honing.

After setting the edge on the 1K (I will need to open a different thread on this subject as I have few questions) I went ahead with the "progression" and on Cristmas Day I enjoyed a nice shave with my first restored (sort of) razor.... and what a sweet shave.... not perfect but very VERY enjoyable.

I guess I am lucky as the blade was in very good condition to start with, but for being the first one I take complete care of , well... I am very pleased.

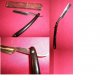
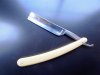
Here are the pics Before and After

[attachment=6263]
[attachment=6264]
 

Attachments

  • HS Black.jpg
    HS Black.jpg
    376.9 KB · Views: 51
  • R0014731r.jpg
    R0014731r.jpg
    287.7 KB · Views: 63
I hope to offer you some helpful advice for your future restorations, before you start to remove metal from the old pin head try spraying the pin and the pivot with plenty of WD40 and move the blade back and forth, this can sometimes make all the difference when you finally get to the stage of tapping the pin out, also regarding the rivet head sorry you are never going to succeed with a punch, tap tap tap tap softly softly catchee Monkey, then use a little masking tape around the scales leaving the head of the pin exposed and start with 2000 grit and finish with 6000 grit micro mesh the pins should look perfect. These are some of my finished pinned razors from a few restores so you can see what I mean regarding the finished pin head.

Jamie

003-3.jpg

004-4.jpg

005-4.jpg

Taylors1000002.jpg

000restore001.jpg

IronDukeCustom004.jpg
 
pugh-the-special-one said:
I hope to offer you some helpful advice for your future restorations, before you start to remove metal of the old pin head try spraying the pin and the pivot with plenty of WD40 and move the blade back and forth, this can sometimes make all the difference when you finally get to the stage of tapping the pin out, also regarding the rivet head sorry you are never going to succeed with a punch, tap tap tap tap softly softly catchee Monkey, then use a little masking tape around the scales leaving the head of the pin exposed and start with 2000 grit and finish with 6000 grit micro mesh the pins should look perfect. These are some of my finished pinned razors from a few restores so you can see what I mean regarding the finished pin head.
Jamie

I like your work, you are right and I should know "better"... one of my passions (MY passion, actually) is mechanics and restorations (cars and motorcycles) and I know few trick to remove pins, broken bolts/screws, etc and I use WD40 on everything (I buy it by the gallon!)

in this case I made two silly mistakes... the first , I misjudged the "solidity" of the pin, I truly believed it was loose. The second was the rush which is always a very bad thing.

Once I got the pin out I noticed there was a bulge and it could never go through the scale in any case... in fact as soon as I forced it , the scale shattered. On a second thought I was supposed to drill a little bit BOTH pins on one side only then remove the scale without pushing the pin out and only THEN remove the pin from the other scale.

Thinking of it, we never know what is undernith the scales, the pin could be clogged with grime and old rust or simply deformed , so by forcing it through the scales it will cause damage to the scales.

Oh well, its part of the learning process... one can get better only by excercizing.

As for the pinning using rivets and a RIVET SNAP, I did try on a hard material and it actually works , BUT that is not possible with the razors simply because of the design and the materials, therefore the "LIGHT TAPPING" is the only feaseable solution.

I think that the rivet snap can be of help in refining and shaping the dome but I need to modify the one I got in order to avoid touching the scale or the washer when tapping it around the pin.

A lot of people uses the Microscrews... easy solution, but honestly I don't like them and I dont thing they are correct (specially in old razors...)

The next job will be rescaling a Ford & Medley I got from "The Invisible Edge"; I had it scaled in red stained pakkawood but I think is not "right" and should be rescaled either in bone or horn (I am of the opinion that old razors should be restored using old materials whenever is possible).
In this case I will use a waterbuffalo horn in black, I have them ready I just need some time to drill them and put it together and as soon as it is ready I will post a couple of pictures.
 
I can't give you any help with the age but congratulations on restoring the razor - it now looks completely acceptable.

Regarding use of rivets, I've used them and treat the open end exactly as I would a piece of rod i.e. peening it over a washer which will achieve the domed effect you are after and which is demonstrated in Jamie's photos. One tip is to reduce the domed end before you start the pinning process - it's easier if you have a vice to hold the pin whilst you file or use sandpaper.

Regarding the honing - do you have another razor that has been honed to a shave ready condition? The reason I ask is that this gives you a good reference point as to what you should be aiming for. If you don't have another razor at the moment I would suggest that you get your razor honed by one of the specialists and then compare how it shaves against your first attempt.

Good luck in your future restores. Keep asking questions if you are unsure.
 
A very good idea by Rob is a vice to hold the pin, I use a simular method, i cut a pin the same size as the largest mole grips jaw width, then I clamp firmly in the mole grips, then I leave a little section protrude outside the jaw, then place my washer over the pin and form a domed head by lightly tapping with my peening hammer once I'm happy and the one side of the pin including the washer and It's correctly domed and will require no more work what I would call a full finish, I will then do the second pin the same, so when you start to re-build the razor you are only really have to work on one side of the pin. PS I'll try and take a photo and put it up if I remember tomorrow.

Jamie
 
UKRob said:
.....
Regarding use of rivets, I've used them and treat the open end exactly as I would a piece of rod i.e. peening it over a washer which will achieve the domed effect you are after and which is demonstrated in Jamie's photos. One tip is to reduce the domed end before you start the pinning process - it's easier if you have a vice to hold the pin whilst you file or use sandpaper.

I am sort of divided between using the rivets and using tha brass rod.

The rivets look very nice, but it is quite difficult to obtain a proper dome unless you spend a long time patiently tapping... there is also the other fact that they stick out considerably more and that might be an issue of preference.

In my case I did sand the rivet's head before fitting in and then polished it slightly after.

I was not looking for perfection, since the blade is not perfect on its own I believe that looking for prefection on the rest of the razor would sound silly; to make an analogy it is like putting brand new chromed bumpers on a car full of dings.

I did make some experiments using the brass rod and the rivets juts to understand and get the feel to it. I ended using the rivet, BUT I think I prefer the finish of the brass rods , to my eye it looks much more original.

Jamie's work is outstanding, I guess you get to that level after several dozens of pins (if not hundreds...)

UKRob said:
Regarding the honing - do you have another razor that has been honed to a shave ready condition? The reason I ask is that this gives you a good reference point as to what you should be aiming for. If you don't have another razor at the moment I would suggest that you get your razor honed by one of the specialists and then compare how it shaves against your first attempt.

Another "properly set up" razor?
I got a Gotta 120 (6/8) and a Tennis (old 9/16 Dovo brand?) both prepared by Neil @ the <Strop Shop>, then I have a Ford & Medley (5/8) prepared by Steve @ <The Invisible Edge> ; these were recently restored and I am also waiting for a W&B to arrive (it is in Neil's workshop) so I will soon have a fresh one.

They are all different in shape and "feel" but I guess I they can be used as good reference points.

I am very happy with my first honing (had another very pleasing shave with the HS&Son earlier today) but I know that before getting it perfect I will need to do lots of excercise.

In any case I think will open another thread related to the honing, but first I want to check if there are already answers to my questions... :icon_rolleyes:
 
I think that as long as you get a good clean, irritation free shave, who cares whether you have a "reference" point. It's your face, not mine. As long as you are happy, that's all that counts.

Anyway, regarding the age, don't let the scales fool you. Scales don't last forever and were replaced with great frequency. I would surmise that there was a cottage industry involving razor repair. There were certainly razor grinders after all.
 
As promised Angelix, this is my method I use for peening a razor, you may find it helpful or you may decide on another but this is what I find works best for me.

Jamie

Firstly cut the pin slightly longer than the jaw of the grips.
fotoflexer_photo-22.jpg


Now clamp pin in the grips firmly but not so tight as to damage the pin, make sure the bottom of the pin is flush to the bottom of the grips as you don't want the pin to move when you start peening, place washer onto pin.
fotoflexer_photo-21.jpg


Now we can start peening the pin and forming a slight dome, I place my mole grips on a 40lb block of steel which I picked up from my local scrap yard.
fotoflexer_photo-20.jpg


Finally the peening finished remove any roughness with some high grit micro mesh buff and polish ready to use for a future restoration.
fotoflexer_photo-23.jpg
 
pugh-the-special-one said:
As promised Angelix, this is my method I use for peening a razor, you may find it helpful or you may decide on another but this is what I find works best for me.

Jamie

Firstly cut the pin slightly longer than the jaw of the grips.

Now clamp pin in the grips firmly but not so tight as to damage the pin, make sure the bottom of the pin is flush to the bottom of the grips as you don't want the pin to move when you start peening, place washer onto pin.

Now we can start peening the pin and forming a slight dome, I place my mole grips on a 40lb block of steel which I picked up from my local scrap yard.

Finally the peening finished remove any roughness with some high grit micro mesh buff and polish ready to use for a future restoration.

when I made my first attempts with the Rod I used a common vice but i was not happy as the criss-cross jaws tend to heavily mark the pin; moreover the vice does not support the pin from the bottom , therefore you need to tight it even more with the result of heavy markings, so I reverted to the rivet which I hammered directly on a small jewellers anvil which I modified to accept a rivet's dome.

Your idea of the grips is an excellent solution as it gives a good lateral support and by laying it on the anvil it also gives a very good support from the bottom.

I did , however, found much easier to create a dome on the brass rod than on the rivet.... I wonder if maybe it is a matter of the brass that is harder on the rivet due to a manufacturing process and only for sake of "study" I will try to heat up some samples and let them cool (fast and slow) and see if that makes any difference.

Anyway, Thanks for sharing your experience!
 
Cheers Guys, if there's anything I can help with and this goes for anyone just ask me, but there's more than enough expertise on this forum to help you solve any kind of problem you may encounter.

Jamie
 
when I made my first attempts with the Rod I used a common vice but i was not happy as the criss-cross jaws tend to heavily mark the pin; moreover the vice does not support the pin from the bottom , therefore you need to tight it even more with the result of heavy markings, so I reverted to the rivet which I hammered directly on a small jewellers anvil which I modified to accept a rivet's dome.


My method differs from Jamie's in that I use a small vice to gently peen a slight dome - just enough to keep a washer in place. I don't find that the vice is tight enough to leave marks and, in any event, they would not be seen when the pin is in position. I only cut the rod to length when the scales are in position thereby minimising waste. I prefer this method because I can ensure the domes on either end of the pin are equal by turning the scales on my anvil during the fitting process. I also use the same pair of cutters so that I know roughly where to cut the length and ensure that both the top and bottom pins end up with the same dome width.
 
Back
Top Bottom